Tin Backsplash:
New Trends For Nostalgic Style
Uniquely new with a twist of nostalgia, a tin backsplash is a hot kitchen backsplash
idea that looks back to Old Europe and 19th century America.
In Europe, plaster was used on walls and ceilings to create intricate patterns and designs.
In America, pressed and painted metal tiles and panels were used as an inexpensive alternative to plaster.
The practice died out during World War I when all metal went to the war effort.
Versatile, inexpensive and easy to install... a tin backsplash can work with a variety of kitchen styles and themes from a cozy country kitchen, to sophisticated Victorian, Tuscan or sleek and modern.
Colors & Patterns

A multitude of colors and patterns are available from many suppliers in sheets or panels.
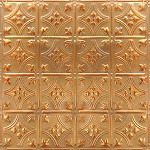
Metallic colors
from brushed and shiny silver to antique copper and pewter are
popular... but you can also find powder coated colors or even paint your
tin to suit your tastes and kitchen design theme.
Painting a tin backsplash
first requires application of a bonding primer for use on metals. Then
apply your desired color in several coats. An exterior oil based paint
will provide the best durability.
Powder coated finishes come in many colors from white to electric blue, brick red or seafoam green and provide a more durable, long-lasting surface than painting, but they are more expensive of course.


The most popular tin backsplash patterns are 3 inch and 6 inch repeating designs. Since most kitchen backsplashes
are 18 inches high (with some being 24 inches) the scale of these
patterns fit evenly between the counter and cabinets for the best
aesthetic balance.
Installation
Basically, you need some sharp tin snips, construction adhesive like Liquid Nails and decorative nails to keep the seams tight.
It's best to plan out your panel/sheet placement and outlet cutouts on graph paper.
Also, using a chalk line on the wall will help keep your kitchen backsplash straight.
If you like the metallic finish, be sure to coat the surface with an exterior grade clear lacquer or polyurethane prior to installation. This protects the surface and makes for easier clean-up.
If you want to dull the shine a bit just use a satin finish urethane. Also, don't handle the sheets or panels with bare hands prior to applying the polyurethane because skin oils can discolor the metal.
Personally, I think the panels are easier to work with. Use the snips to cut the panels to fit and for the outlets. Wear heavy gloves because the metal is sharp.
Make sure your walls are flat without any bumps or blemishes that will show through the tin. Light wall texture should not be a problem, but you may want to sand it down a bit to make it as smooth as possible. This will also allow for better adhesion of the glue.
If you need to, you can add a thin sheet of plywood or thin drywall to the existing walls to ensure a flat surface.
Cost
Tin backsplash panels will run from $10 to $50 each depending on size of the panel (12x12 or 24x24), finish, coating and design.
Tin backsplash sheets typically come in two different sizes: 18 x 48 inches and 24 x 48 inches. Prices typically range from $50 to $150 again depending on a variety of variables.
Cleaning
Nothing special is required for cleaning your tin backslpash. Regular soap and hot water will work or a neutral pH cleaner like Stone PLUS Cleaner. Don't use abrasive cleaners or scrub pads, which damage the finish and coating.
back to Kitchen Backsplash Ideas
back to Metal Backsplash... from tin backsplash
back to Countertop HOME